Monday 17 June 2013

How to record Assemblies

How to record Assemblies


Open Peachtree software from task menu select Assemblies following window will display.


First select item ID obviously select the assembly item click look up button show all item enter reference and date and in quantity to build field enter quantity which purchased and  if we have reason then mention the quantity.


Saturday 15 June 2013

What is global option in Peach tree Software

What is global option in Peach tree Software
Open Peach tree software from option menu select global option following window display


In accounting head select decimal you will select 2 , 3 , 4 decimal after the amount if click automatic then decimal written automatically hide General Ledger account, account receivable account payable and payroll if you check mean click on box account receivable hide the account then next is General.


In General improve performance line item entry display , smart data entry, and color scheme
In improve performance check box do not print total page length. In smart data entry you will write few spelling automatic complete the word next is Peach tree partners.


In Peach tree partners if you click Low then you will allow all Peach tree partners to run application. If you click on Medium to run Peach tree partners application warn before to run application. If you click High do not allow any Peach tree partners to run application.


In spelling head you will check spelling as you type.


How to maintain General Journal Entry

How to maintain General Journal Entry


Open Peachtree software from task menu select General Journal Entry following window display.


In this window first we will select date in General Ledger account select the account ID from maintain charts of account in description column suppose to record depreciation the entry is depreciation account debit accumulated depreciation account credit but in  description field only write depreciation because in General Ledger account field account ID show the account title and enter the amount in debit , credit field this will show the window is given below.


After enter the transactions the last step is to save it.


Friday 31 May 2013

How to make maintain vendor credit memo

How to make maintain vendor credit memo

Vendor credit memo is prepared when we want to account for return of goods purchased


From the task menu select vendor credit memo and see the following window


After click on vendor credit memo enter the vendor ID , select date the date which the goods return , enter credit number , selected invoice number and then enter item , quantity , goods returned , general ledger account and unit price.

Quotes / sales orders


From task menu select quotes/sales orders in quotes/sales orders two things quotations and sales orders first I will explain quotations click on quotation display the following window


In sales quotation first enter customer ID , select date good thru Quote number , and quantity , item, unit price.

Sales orders


In sales orders enter customer ID , select date , ship by , sales orders number , and quantity , item , and unit price.


Wednesday 15 May 2013

How to task payments for purchase order


Payment

From the task menu select payment


Select payment display the payment window


·         VENDOR
Its about the information of vendor which we want purchase from such person.
·         CHEQUE NO.
In cheque no field enter the cheque no.
·         DATE
If we payment within in discount period we will received discount which we will treated as income.
·         PAY
When we click on pay field we will see that the discount will show in the discount Colum.
·         DISCOUNT ACCOUNT
In discount account we will make the the discount account in chart of accounts.

How to make purchase/receive inventory


How to make purchase/received inventory
Open Peachtree software from the task menu select purchase/received inventory


Display the purchase/received inventory window


Enter vendor ID if vendor is already exist then press lookup button and see vendor ID otherwise double clicking where cursor blinking  which display the maintain vendor window.


Enter the date in the date field.


Enter the invoice no in invoice no field


After fill invoice no in invoice field select purchase order no


After select the purchase order no then next step is quickly review that correct or not


After the quick review to save data click the save button .

Tuesday 14 May 2013

How to save purchase order


How to save purchase order

First open Peachtree software from the task menu and select the purchase order


After select the purchase order display the following window


1-  Enter vendor ID if vendor is already exist then press lookup button and see vendor ID otherwise double clicking where cursor blinking  which display the maintain vendor window


Enter the date in the date field
Enter the purchase order is good through in good thru field


Enter the purchase order no in purchase order field


In quantity field enter the quantity which is given in transaction


In item field we will enter inventory if item is already exist press lookup button and see the item otherwise double click where cursor blinking which display the maintain inventory window


In per unit price field we will enter the price per unit which is given in transaction


For save after complete the purchase order transaction from the option bar click on save


Sunday 21 April 2013

Maintain Vendor Account


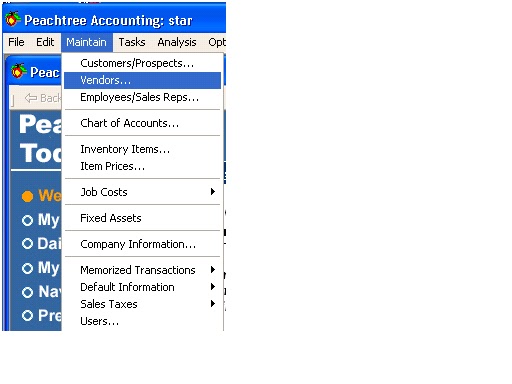
Maintain Vendor Record


Maintain vendor record click maintain and vendor and display the maintain vendors window.


Circle portion is called header fields and in this portion we enter vendor ID and name.


In general tab enters basic information about the vendor such as contact information, address, phone and fax numbers, and beginning balances.


In purchase defaults you can change this information at the transaction level. In purchase rep you can enter or select an employee to act as the purchase rep. In purchase account Enter a Ledger account for the default purchase account for this vendor. Tax Id is not use in Pakistan. In terms you can choose to use the standard vendor payment terms vendor. Select the Terms button to change the payment terms. And then click custom fields display the following window.


In custom field information for the selected vendor record. And then click history tab following window will appear.


Vendor Since: Enter the date you first had a transaction with the vendor.
Last Invoice Date: Enter the date of the last invoice you received from the vendor.
Last Invoice Amt.: Enter the amount of the last invoice.
Last Payment Date: Enter the last date you paid the vendor.
Last Payment Amt.: Enter the last amount you paid the vendor.

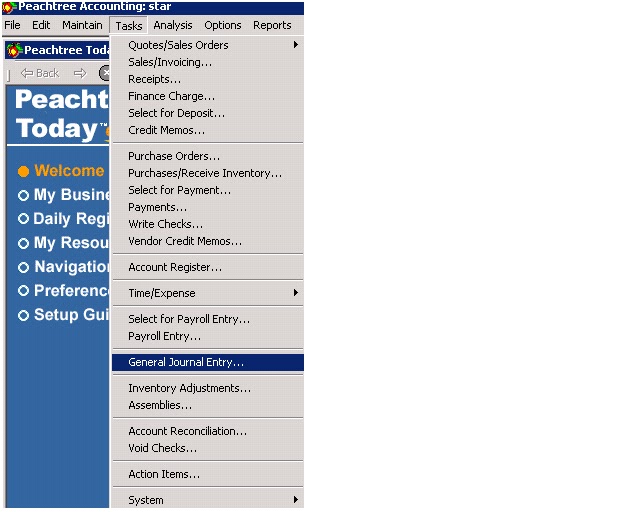
Default Information of Vendors


The next step is the default information for this we will be go to the menu of maintain where select the default information and then select the vendors in sub menu such following are.


After this it will be appear a window such as following
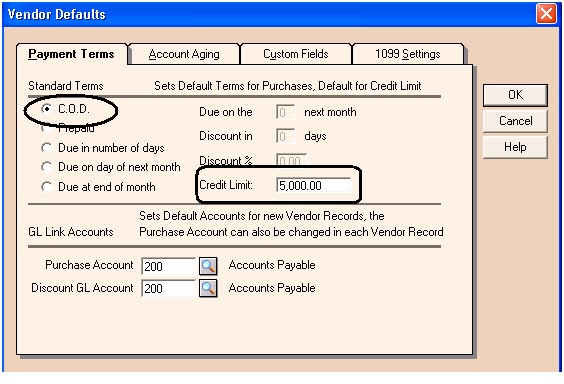
Payment term:


Here different option of the vendors default, accounting, custom fields, and 1099 settings. Now I will discussed all steps such are
C.O.D (cash on order):
    Cash an order mean cash received when the goods was sale .which window such as following.


Here the net due, discount in, discount % cannot mention because the cash had already receive.
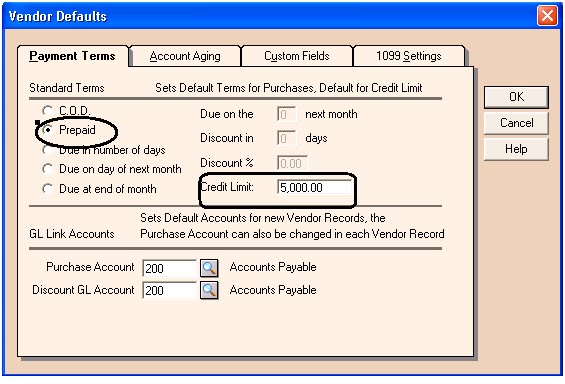
Prepaid:
Here mean the cash are send to seller for order the goods before collected the goods.


Here also not give discount and net due.
Due in number of days:


When the something is purchase sometimes the goods are purchase on credit base. So in this the time is give discount such as 3/10, n/30. Its mean seller give 3% discount on the sale if the buyer pays the amount in 10 days while total credit time is 30 days.  Here they also enter the ID of the purchase general ledger purchase account.
Due on day of next month:


Its mean the due will be on next month of the day
Due at end of date:


Its mean the due will be the end das of the month.
Account aging:
This tells about the account aging by two methods invoice and due date. Here we also fill the payment days with your choice period.


Custom field:
This tells about the information about the customer which we can blank labels can fill with his choice.


.